Endian Firewall provides a Network Setup Wizard for easy and fast configuration of your network interfaces and your uplink. The Wizard is divided into steps with intuitive dialogues. Some steps may have substeps. The first line of each dialogue window will display the actual step or substep, how many you need to go through and a short description about the actual page. You can go forth or back with the buttons and during network wizard as you wish and you can always abort the configuration process by hitting the button. On the last dialogue window you will be asked if you really want to save the configuration you created using the wizard. If you decide to proceed the configuration will be stored and Endian Firewall will reconfigure it's interfaces. This takes some time and over this period of time you will not be able to reach the web interface anymore.
The RED interface is supposed to be the interface which connects your Firewall to the "outside", the untrusted network, which normaly of course is the internet, or the uplink to your internet provider.
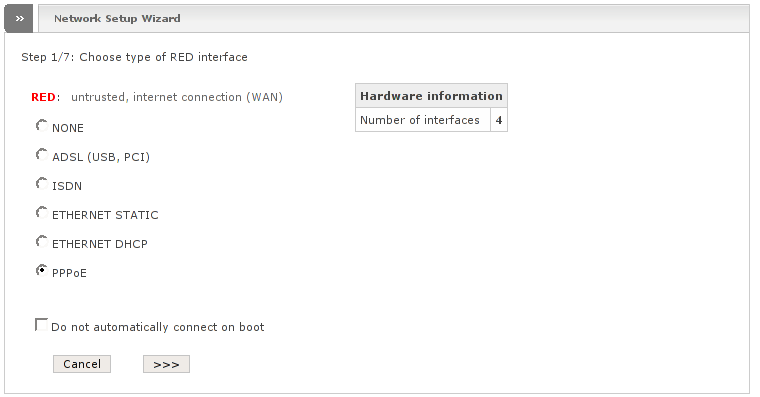
Endian Firewall does support the following types of RED interfaces. Some may be network interfaces, other may be PCI cards or USB devices:
- NONE
Your firewall has no RED interface. This is unusual since a firewall normaly need to have two interfaces as minimum. But for some scenarios this possibility does make sense. For example if you want to use only a specific service of the firewall. If you choose this you will be able later to set a default gateway which does not lie within RED network.
- ADSL
If you have a USB or PCI ADSL modem you are right with this option.
- ISDN
Select this if you have an ISDN USB device or PCI card.
- ETHERNET STATIC
Select this if your RED interface is a simple ethernet card and you need to setup network information like IP address, Netmask and so on manually. If your need to connect your RED interface to a simple router so this may be the right choice. Remember that in most cases you will need a crossover cable in order to connect it correctly.
- ETHERNET DHCP
Select this if your RED interface is a simple ethernet card which needs to get network information through DHCP. Most Cable modems, ADSL/ISDN router provide this possibility.
- PPPoE
If your RED interface is a simple ethernet card connected to a device which needs you to use PPPoE in order to connect to your provider, then select this. Pay attention to not confuse this option with the ETHERNET DHCP or ADSL option. This is only needed if your modem uses bridging mode and does not connect itself via PPPoE to the internet provider. Some ADSL routers let you connect using DHCP or STATIC and establish the ADSL connections themselves using PPPoE. Also this is the wrong option if you have a USB or PCI ADSL modem and want the modem to connect using PPPoE.
If you do not want your red interface to connect to your uplink while booting you have to tick the checkbox.
On this page you will find also a box which displays the amount of network cards which could be found. Depending of this value and if you already have exhaused a network card selecting a RED type which needs a network card, the following step let's you configure more or less zones.
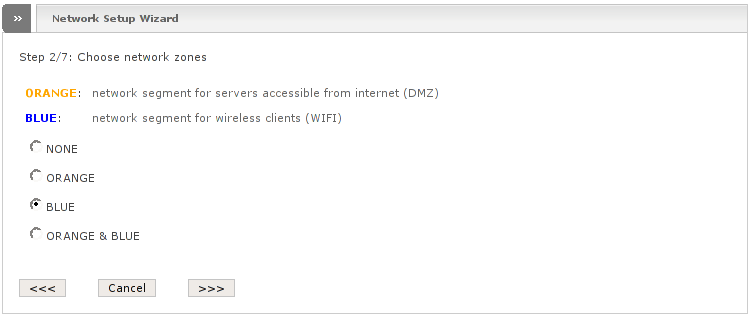
With this step you can decide which zones you want to configure on your firewall. Endian Firewall assumed IPCops idea of different zones. The following zones are available:
- GREEN
is the trusted network. This is supposed to be your LAN from where you connect to the administration interface. This is the mandatory zone and one network interface is reserved for it.
- ORANGE
is the demilitarized zone (DMZ). If you host servers it is wise to have them on a different network than your local network. If someone manages it to break in to one of your servers, this attacker does not automatically compromise the local network, but it is trapped within the DMZ and can't gain sensible information from your local network. Note that it makes no sense to use ORANGE if the servers behind ORANGE and the workstations behind GREEN share the same switch or hub!
- BLUE
is the wireless zone. You can attach a hotspot or Wifi access point to an interface assigned to this zone. There is only a logical difference between this zone and ORANGE. Since wireless networks normally are not really secure you may prefer to put them into a separate zone since they have no access to the local network behind GREEN and cannot reach hosts behind ORANGE without configuration.
- RED
As already described, the RED zone stands for the uplink to the internet provider or to another untrusted network - basically most of the times all the other zones have to be protected from intruders from this zone. You automatically have this zone unless you selected NONE on the dialogue before.
You need to have at least one network card per zone so some options may not be visible for you if you do not have enough network cards. Note that one network card is reserved for the GREEN zone and one may be already assigned to the RED zone if you have selected a RED type which needs a network card.
You can choose between the following options:
- NONE
Choose this if you do not need additional zones. You live with GREEN and RED.
- ORANGE
You want to have only the ORANGE zone in addition to GREEN and RED.
- BLUE
You want to have only the BLUE zone in addition to GREEN and RED.
- ORANGE & BLUE
You want to have both, ORANGE and BLUE and will continue with a full featured firewall.
This step asks you for configuration of all the ethernet zones you enabled on the previous page (GREEN, ORANGE and/or BLUE). Each zone has to be configured in the same way - on our screenshot below you can see the configuration of the green and orange interfaces. At the bottom of this page it is also possible to configure the hostname and domainname of your firewall.
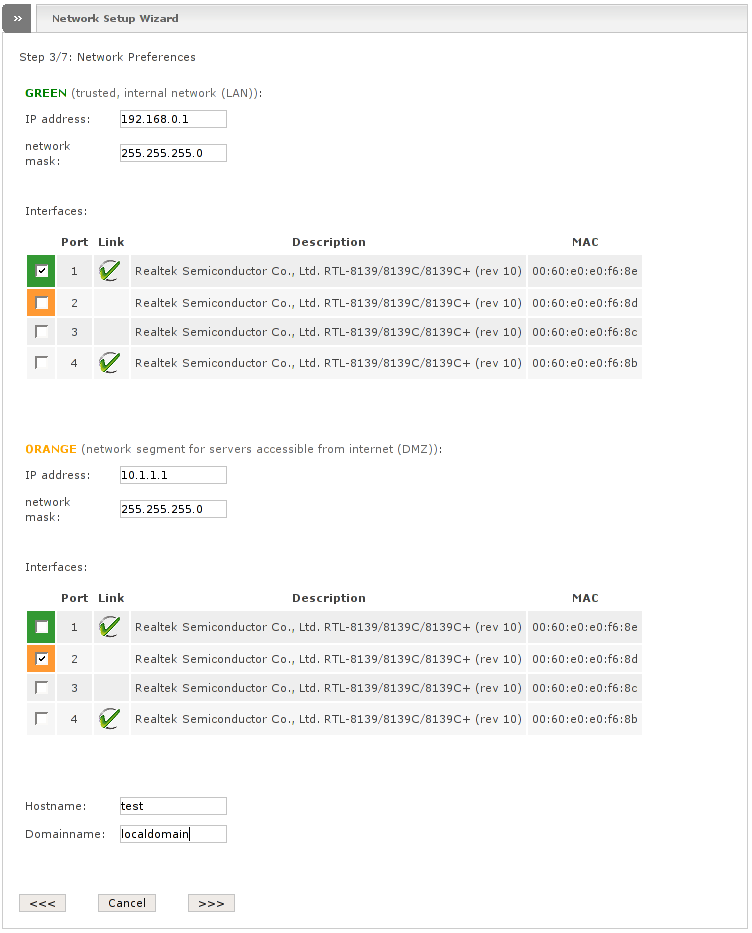
You need to configure the following fields for each zones:
- IP address
Provide the IP address which you'd like to use for the interface of the respective zone. For example: 10.1.1.1. Pay attention to use an IP address which is not already used within your network, especially if you would like to change the IP address of your GREEN zone. Note that you need to use different subnet's for different zones. For example if you use 10.1.1.1 in GREEN, you may use 10.2.2.1 for ORANGE, but not an IP address of the same network, like 10.1.1.2! The network wizard will not allow you to go forth if networks will overlap or if you do not fill out all necessary fields. It is suggested to follow the standards described in RFC1918 and use only IP addresses which are reserved for private networks. The following blocks of IP address space have been reserved for private networks by the Internet Assigning Numbers Authority (IANA):
10.0.0.0 - 10.255.255.255 (10.0.0.0/8)
172.16.0.0 - 172.31.255.255 (172.16.0.0/12)
192.168.0.0 - 192.168.255.255 ( 192.168.0.0/16)
Note
It may also be wise to follow some conventions and always assign the first ip address to the firewall. For example 192.168.0.1.
Note
IP addresses ending in .0 (example: 192.168.0.0) and in .255 (example: 192.168.0.255) are reserved for network address and broadcast address. You shall not assign them to any device.
Note
Pay attention if you reconfigure Endian Firewall and change some ip addresses, then you need to change the ip address also within configuration of some services like the HTTP proxy, which is descibed later in efw.proxy.http.
- Network mask
Provide the network mask which you like to use for the interface of the respective zone and the network behind it. For example: 255.255.255.0.
Note
Pay attention to use the same network mask on all of your computers behind the same zone or some may not be able to pass the firewall.
- Interface
Each zone needs to have at least one interface assigned. The network wizards gives you a suggestion about interface assignement. You certainly may change this. One interface can be assigned only to one zone. The network wizard does not allow you to go forth if you choose the same interfaces on different zones. You can assign multiple interfaces per zone. Multiple interfaces can be added by pressing Ctrl and clicking on the desired interfaces. The interfaces will then internally bridged together, so they have the same functionality like a switch.
The interface list shows you all necessary information to identify your network card:
consecutive numbers: The interface list will be sorted on the basis of the PCI slot identification number. Therefore you are save to give your PCI mounted network cards an index counting from the first to the last. The first network card in your computer should be the card with number 1. The second with number 2, and so forth.
device description: We use lspci to read out this description. If your device is not included within our pci devices list because it is to new or to exotic, the description will be something like "Unknown device".
MAC address: The original MAC address of the device. This address should be worldwide unique (In reality it's not always). Most devices have printed their MAC address somewhere on the card or within manual.
Note
Interfaces which are not supported by ethtool will not be supported by the network wizard because the necessary information cannot be gathered.
Note
Note that each of this zones will be internally handled as bridges, regardless of the amount of assigned interfaces. Remember this if you find any interface names. The interface name of a zone is always called brX and not ethX. ethX is just the name of the physical interface which is part of the respective zone.
During this step you can configure the preferences needed to connect to the internet or your untrusted network outside your firewall. You will find different configuration options on this page, depending on the type of RED interface you have chosen on the first page of this connection wizard. Some RED types need more configuration steps than others, therefore you may find substeps. The following section will descibe every step for each RED interface type.
If you have choosen NONE as RED type on the first wizard page, you probably want to read this.
Since you have no RED, you do not need to configure it. Wow, how impressive.
In order to allow your Security Device (In this case I do not dare to speak of a firewall) to access other networks like the internet you need to configure a default gateway. Here you can set this up. In this only case you can use each ip address as default gateway, which belongs to a network of your other zones (GREEN, ORANGE or BLUE). Normally you want to use an IP address belonging to the GREEN network, which probably may be another firewall and gateway to the internet.
If you have chosen ADSL as RED type then this will be of interest to you.
Since ADSL modems need a bunch of information this step is divided into three substeps.
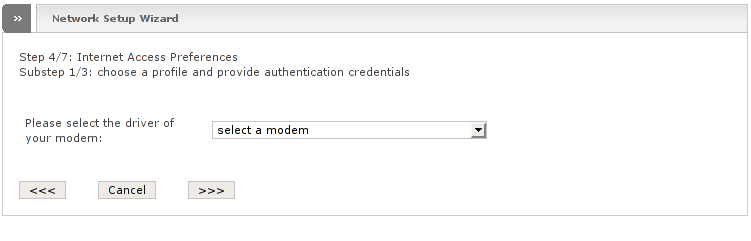
Within the first substep you need to select which modem you like to use. The box on this page shows you all the modems which will be actually supported by the Endian Firewall. If you can't find your modem then it obviously will not be supported and will not work. If your modem is already plugged in, Endian Firewall will try to recognize it automatically and preselects the first detected modem. The following string will be displayed on each modem which has been detected automatically:
--> detected <--
The following modems are actually be supported:
ADSL modems with Conexant chipset.
Fritz!Card DSL
Fritz!Card DSL v2
Fritz!Card DSL SL
Fritz!Card DSL SL USB
Fritz!Card DSL USB
Fritz!Card DSL USB Analog
Figure 2.10. Network wizard showing Step 4 with RED type ADSL: Substep 2: Choose ADSL connection type
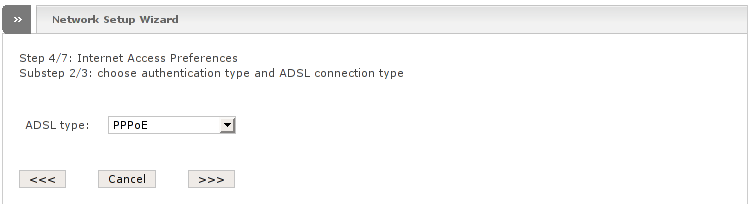
Endian Firewall supports four different possibilites to connect to an ADSL concentrator. You need to know which connectio type is supported by your internet provider and use the respective type. Often internet provider allows you to choose between PPPoA and PPPoE. Should this be the case you can choose between those 2 options. Keep in mind that PPPoE causes a little more traffic overhead compared to PPPoA, if this is of importance for you. The four possibilities are:
- PPPoA
PPP over ATM. You can find further information about this protocol on Wikipedia.
- PPPoE
PPP over Ethernet. You can find further information about this protocol on Wikipedia
- RFC1483 static IP
Basically this is a protocol which allows you to handle your modem like an ethernet device to which you assign an IP address manually which you negotiated with your provider before. If you have a real static IP you may need to use this option. You can find further information about this protocol on RFC Editor. http://www.rfc-editor.org/rfc/rfc1483.txt
- RFC1483 dhcp
Basically this is the same as RFC1483 except that the provider assigns your ip address using DHCP.
This substep depends on the decision you made during the previous substep. Depending on the selected ADSL connection type this substep will show you different configuration options. Most of the needed information will be provided by your internet service provider. The following fields are common for each ADSL type. They depend on the infrastructure of your ISP so you need to fill in the values you get from your provider:
VPI number
VCI number
Encapsulation
- PPPoA/PPPoE
Figure 2.11. Network wizard showing step 4 with RED type ADSL: Substep 3: Supply connection information (PPPoE)
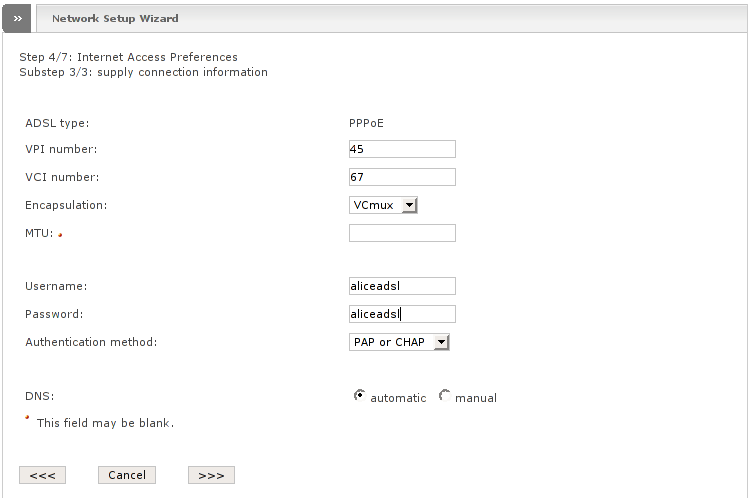
Configuration for PPPoA and PPPoE are quite the same, therefore only PPPoE will be described here. The following fields do exist additionally to the common fields described above:
- Username
Provide the username which you got from your ISP.
- Password
Provide the password which you got from your ISP.
- Authentication method
Different protocols can be used to authenticate against the providers system. The following authentication methods are supported:
PAP - Password Authentication Method
CHAP - Challenge Handshake Authentication Protocol
PAP or CHAP - both authentication methods are implemented.
Some providers may support only one authentication method. In that case you should get that information from your provider. Most providers implement both authentication methods, then it is safe to use whatever you want or to leave the decision to the system by selecting PAP or CHAP.
- DNS
During connection establishment of a PPP connection, the provider normally sends information about which DNS servers you need to use as DNS resolver. If you select automatic those values will be used. If you wish to configure them manually, then select manually. In some cases this may be useful, for example if your provider sends wrong information or if the supplied DNS resolvers do not work correctly.
- RFC1483 static ip
Figure 2.12. Network wizard showing step 4 with RED type ADSL: Substep 3: Supply connection information (RFC1483 static ip)
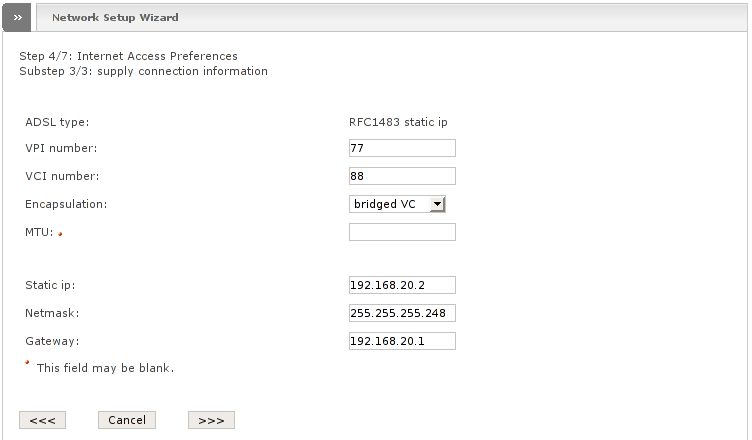
If you got a real static IP from your provider, then normally this type will be used. This type does not know any authentication or protocols to establish the connection. Therefore the providers system cannot automatically send you configuration parameters (like IP address, DNS, ...) during connection establishment. You need to ask your provider for this information and need to configure everything manually here. Once configured there is no system that changes these parameters automatically like with the other ADSL types. The following fields do exist additionally to the common fields descibed above:
- Static IP
Fill in your public IP address your provider assigned to you. If you do not have this information ask your provider. If you use the wrong IP address you may not be able to use the connection.
- Netmask
The network mask you got from your provider. For example: 255.255.255.0
- Gateway
The IP address of the gateway located on your provider's side which should be used as your default gateway.
- RFC1483 DHCP
Figure 2.13. Network wizard showing step 4 with RED type ADSL: Substep 3: Supply connection information (RFC1483 DHCP)
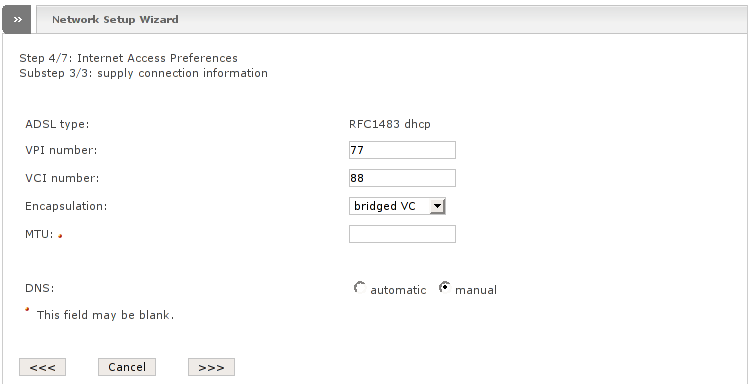
This ADSL type is the same as RFC1483 static ip, except that you do not need to provide IP address, netmask and gateway because that information will be automatically retrieved using DHCP. The following fields do exist additionally to the common fields described above:
- DNS
During connection establishment of a PPP connection, the provider normally sends information about which DNS servers you need to use. If you select automatic those values will be used. If you wish to configure them manually, then select manually. In some cases this may be useful, for example if your provider sends wrong information or if the supplied DNS resolver do not work correctly.
If you chose ISDN as RED type you will see the following dialogue page within the fourth step.
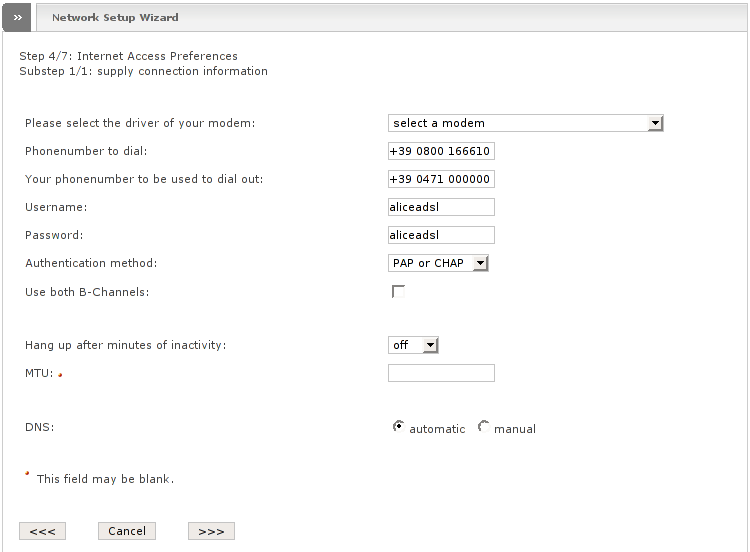
The following section will describe each of the fields:
- Please select the driver of your modem
Here you need to select the type of modem you are using. The selection box shows you all the modems that are actually supported by the Endian Firewall. If you can't find your modem then unfortunately it is not supported and will not work. If your modem is already plugged in, Endian Firewall will try to recognize it automatically and preselects the first detected modem. The following string will be displayed next to each modem that has been automatically detected:
--> detected <--
The following modems will actually be supported:
AVM GmbH, Fritz Card USB2 (Version 3.0)
AVM GmbH, Fritz Card USB2 (Version 2.0)
HFC-S PCI (Billion and compatible)
HFC-S USB TA (Billion, Trust or compatible)
AVM GmbH, Fritz Card PCI
AVM GmbH, Fritz Card USB
- Phonenumber to dial
Fill in the telephone number of your Internet Service Provider, that you need to dial to connect to the Internet.
- Your phone number to be used to dial out
Fill in the telephone number of your telephone which you want to be used when you dial out. This number may be also known as MSN.
- Username
Provide the username you got from your ISP.
- Password
Provide the password you got from your ISP.
- Authentication method
Different protocols can be used to authenticate against the providers system. The following authentication methods are supported:
PAP - Password Authentication Method
CHAP - Challenge Handshake Authentication Protocol
PAP or CHAP - both authentication methods are implemented.
Some providers may support only one authentication method. In that case you should get that information from your provider. Most providers implement both authentication methods, then it is safe to use whatever you want or to leave the decision to the system by selecting PAP or CHAP.
- Use both B-Channels
Enable this if you want to use both ISDN channels bundled in order to double your bandwith. Your provider must support this.
- Hang up after minutes of inactivity
If you want the modem to close the connection to your internet service provider if no data will be sent through it you may enable this. If you select a value different to off, the modem will close the connection after the selected minutes of inactivity.
- DNS
During connection establishment of a PPP connection, the provider normally sends information about which DNS servers you need to use as DNS resolver. If you select automatic those values will be used. If you wish to configure them manually, then select manually. In some cases this may be useful, for example if your provider sends wrong information or if the supplied DNS resolvers do not work correctly.
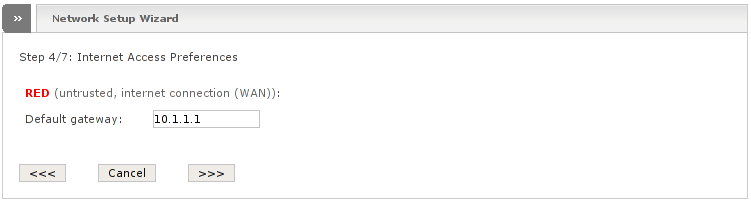
This dialogue page will be shown if you chose ETHERNET STATIC as your RED type.
Figure 2.15. Network wizard showing step 4 with RED type ETHERNET STATIC: Internet Access Preferences
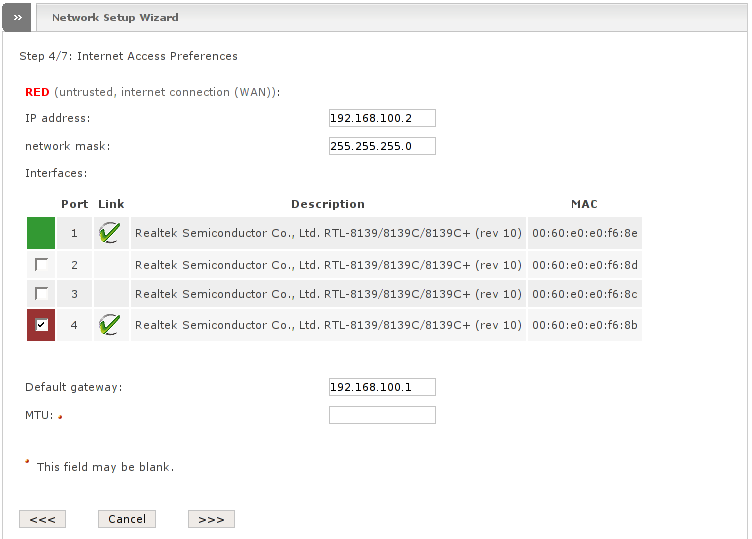
Configuration is pretty the same as described before in the section called “Network preferences”. Actually you can have only one RED device, therefore you cannot select multiple interfaces. Additionally you need to configure a default gateway. That is the IP address of your remote host to which the firewall is connected to and which will be used as gateway to the internet. This IP address must be located within the RED network. The network wizard does not allow you to provide a default gateway which is not within the RED network. For example if you use 192.168.0.1 as IP address and 255.255.255.0 as network mask, the default gateway cannot be 192.168.1.1. A possible value would be 192.168.0.2.
This dialogue page will be shown if you chose ETHERNET DHCP as RED type.
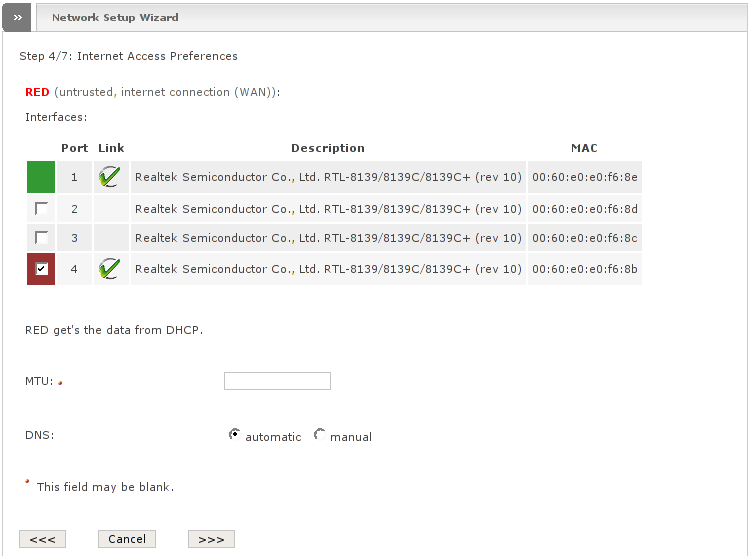
ETHERNET DHCP is pretty the same as ETHERNET STATIC, except that there is no need to configure the device, since all necessary information will be retrieved from the DHCP server. You only need to select which interface you would like to use for your RED zone. Since there is actually no possibility to have more than one RED interface, you can not select multiple interfaces. The following configuration options exist:
- Interface
Select the interface you want to use as RED interface as already described above.
- DNS
The DHCP server will also send you the IP addresses of your DNS servers. If you select automatic these addresses will be used. If you wish to configure them manually, then select manually. In some cases this may be useful, for example if your DHCP server sends wrong information or if the supplied DNS resolvers do not work correctly.
This dialogue page will be shown if you chose PPPoE as RED type.
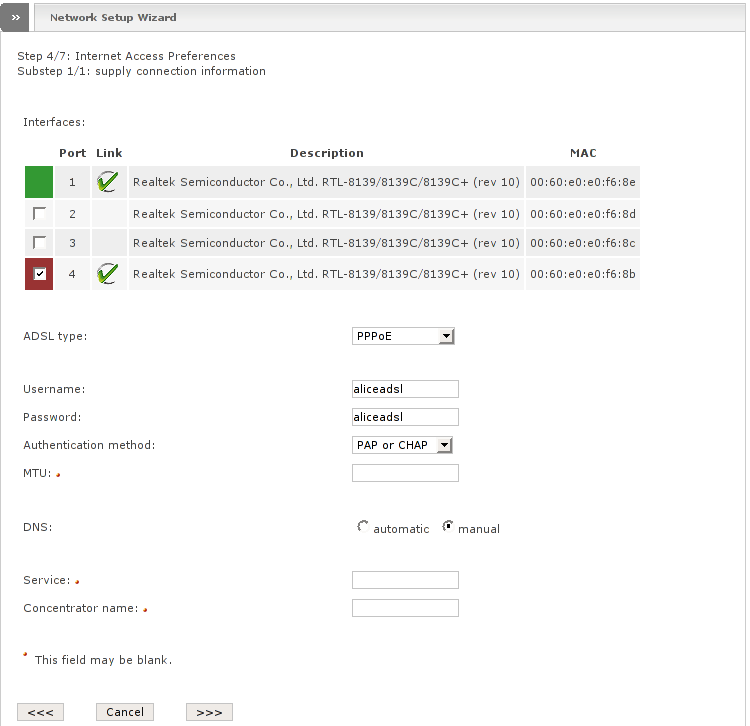
As already mentioned before, you use this type if you have an ADSL modem with a simple ethernet connection to your Endian Firewall.
Note
This cable in most of the cases has to be crossover!
The following configuration options are supported for this type:
- Interface
Select the interface you want to use as RED interface and to which you connected the ADSL ethernet modem.
- ADSL type
This option will disappear. It makes no difference what you select here.
- Username
Fill in the username you got from your internet service provider
- Password
Fill in the password you got from your internet serivce provider
- Authentication method
Different protocols can be used to authenticate against the providers system. The following authentication methods are supported:
PAP - Password Authentication Method
CHAP - Challenge Handshake Authentication Protocol
PAP or CHAP - both authentication methods are implemented.
Some providers may support only one authentication method. In that case you should get that information from your provider. Most providers implement both authentication methods, then it is safe to use whatever you want or to leave the decision to the system by selecting PAP or CHAP.
- DNS
During connection establishment of a PPP connection, the provider normally sends information about which DNS servers you need to use as DNS resolvers. If you select automatic those values will be used. If you wish to configure them manually, then select manually. In some cases this may be useful, for example if your provider sends wrong information or if the supplied DNS resolvers do not work correctly.
- Service
Some ISPs provide different services, therefore you may insert the service name here in order to select which one you want to use if it is necessary. In most cases this option is meaningless.
- Concentrator name
Specifies the desired access concentrator name. In most cases you should not specify this option. Use it only if you know that there are multiple access concentrators and your ISP wants you to specify a particular one.
This step is only needed if the RED connection type does not automatically provide the addresse of the DNS resolvers which should be used or if you have selected in the previous step that you want to set the DNS resolvers manually. If DNS resolvers are retrieved automatically then no configuration fields will be shown here. You can safely go ahead. Otherwise you will see two fields labeled DNS 1 and DNS 2.
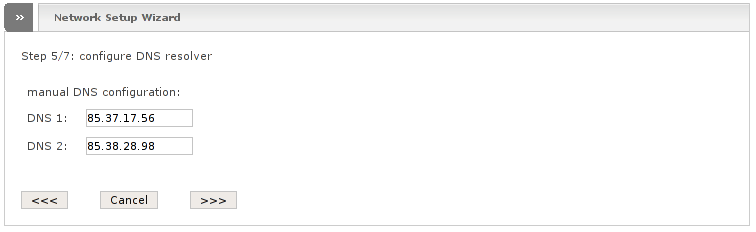
Fill the both fields with the DNS servers you want to use as resolvers. If you have only one then it is safe to fill in the same value in both fields but this is not recommended since you will not be able to resolve names anymore if that nameserver will not answer temporarily. You need a working DNS resolver in order to resolve names. If resolving does not work you may not be able to access internet sites.
This is the last step of the network wizard. It only asks you to confirm the modifications.

Click the button OK, apply configuration to go ahead. Once you did this, the network wizard will write down the data, reconfigure all necessary devices and restart all depending services. This may take up to 20 seconds. During the restarting process you may not be able to connect to the administration interface and for a short time no connections through the firewall are possible. So no worries, that's normal. The administration interface will automatically reload after 20 seconds.
If you changed the ip address of the GREEN zone you will be redirected to the new IP address, after the 20 seconds of course. In this case and/or if you have changed the hostname a new SSL certificate will be generated.
Note
There is an issue when managing more than one Endian Firewalls. The browser will refuse the new certificate because it finds that the certificate is corrupt. You can solve this issue by removing all accepted certificates from the browser cache or closing all running browser windows and then restart the browser.