In this section you can create "snapshots" of your EFW configuration, and restore the system to one of these snapshots when needed.
These snapshots can be saved on your EFW machine or exported to your computer.
Inis also possible to reset the configuration to factory defaults and to create fully automated backups.
On this site you can manage the creation, export, import and restoration of your EFW backups. You will be presented with a list of all the backups you have made so far. The backups are sorted by date where the latest backup is on top of the list.
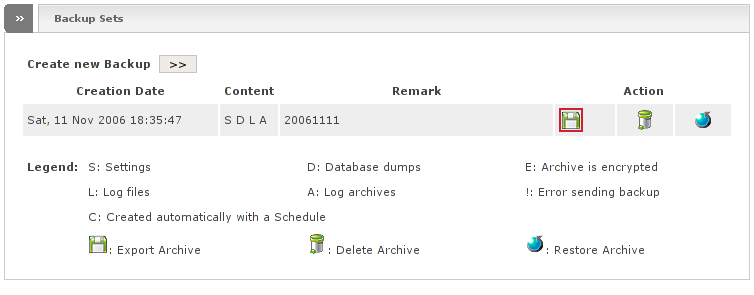
The column contains the creation date, while the column shows a list of flags that will tell you more about your backup:
- S
This flag means that this specific backup contains your settings.
- D
D tells you that this backup contains a database dump.
- E
This archive is encrypted.
- L
This backup contains log files.
- A
Older log file backups have been saved with this backup.
- !
There was a problem when trying to send this file.
- C
This backup was created automatically by the backup scheduler.
The disk in the columns will let you store the backup file on your computer. By clicking the garbage bin you can delete this backup file. If you click the last symbol this backup will be restored.
By clicking on the button, Endian Firewall will open a new window in which you can configure your new backup.
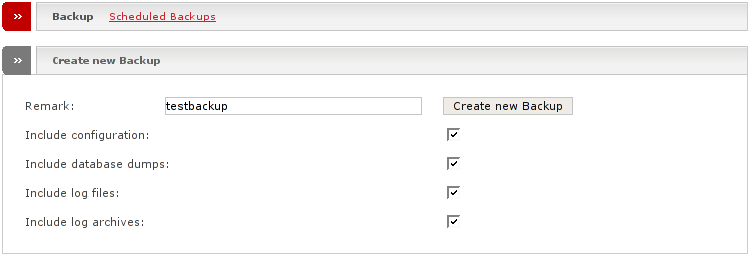
The following options can be specified before the creation of the backup fule:
- Remark
This field gives you the possibility to add some personal information which will later let you remember the reason for this backup.
- Include configuration
This option lets you include the configuration of your Endian Firewall - This is the content of the /var/efw directory.
- Include database dumps
If you want to include dumps of your database tick this checkbox.
- Include log files
If you want to include your log files this checkbox should be checked.
- Include log archives
If you also want to include the backups of your old log files tick this checkbox.
- Create new Backup
By hitting this button the new backup file will be created and saved. You can now find it in the list of your backup sets.

You also have the possibility to encrypt your backups if you want to. To do this you need to do the following:
Select your public key by clicking on the button and then selecting the key file.
Make sure the checkbox is ticked.
Upload the key file by clicking the button.
You can export backup files to your computer by:
Choosing the set you want to export.
Clicking on the disk image () and saving the file on your computer.

If you want to import a backup file from your computer you have to do the following:
Choose a name for the backup and write it into the field.
your local folders and select the backup file you want to import.
Finally click the button - your backup will be saved on the Endian Firewall and then show up in the list of backup sets.
Note
By importing your backup it will not automatically be restored. Read here how you can restore your backup.
To restore the system from exported backup files:
import your backup file
choose the new set in your backup list
click the button
To restore the system from a backup set on your EFW:
choose the set you want to restore
click the button
Note
The button is the button with the blue circle orbitted by a grey arrow.
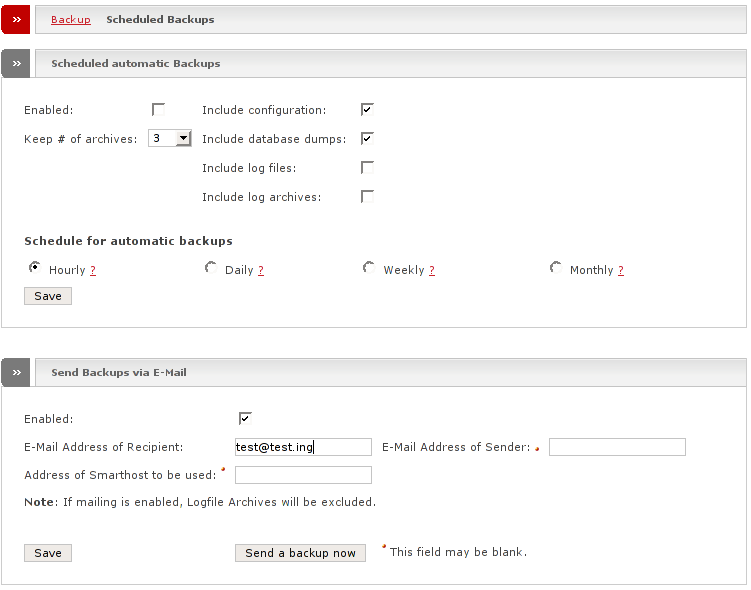
If you want to schedule automatic backups you will be presented with two windows. The first window is used to configure the scheduling itself while the second window gives you the opportunity to automatically send the created backup files to you via e-mail.
Scheduling your backups is very easy and the options regarding the backup content are the same as when creating manual backups. New options are:
- Enabled
Check this if you want automatic backups.
- Keep # of archives
This number lets you decide how many automatic backups you want to save on your Endian Firewall.
- Schedule for automatic backups
Choose here how often you want to create a backup of your firewall.
- Save
Click this button to save the configuration.
Note
If you move the mouse cursor over the question marks you will see detailed information about the schedules.
If you want to receive an e-mail for every automatic backup you'll have to have a look at the second window.
- Enabled
Tick this if you want e-mails with your backup files.
- E-Mail Address of Recipient
Here you need to enter the address you want the backups sent to.
- E-Mail Address of Sender
Here you can specify a sender-address for the automatic e-mails.
- Address of Smarthost to be used
If your e-mails are considered spam by many mail servers because you are using a dynamic IP address you'll probably want to enter the address of your internet service provider's mail server here. All backups will then be sent through this mail gateway.
- Save
Click here to save your options.
- Send a backup now
If you want to save a backup now and have your settings stored click this button.
Note
If you enable mailing, logfile archives will not be sent to keep the backup files at a reasonable size.
