OpenVPN is an SSL/TLS based virtual private network solution. It uses the industry standard SSL/TLS protocol to create the encrypted tunnel which can transmit packets of OSI layer 2 or 3. Pay attention to not confuse OpenVPN with what many vendors call SSL VPN. Most of them only claim to be real SSL VPNs, instead they actually are just application level gateways that tunnel only application streams of certain services through an encrypted tunnel without implementing a whole VPN, which in fact is a site-to-site tunnel. As a real SSL VPN, OpenVPN has the ability to tunnel all your traffic from OSI layer 2 on, so even ARP traffic can be transmitted to the remote endpoint.
The main advantage of this type of VPN is the ease of use. Since OpenVPN is an application on both sides of the tunnel, it runs of course in user-space instead of kernel space. Therefore it does not even need modifications of the kernel and furthermore minimizes the probability of a catastrophic failure which is certainly higher for software which runs in kernel space. This makes the whole A LOT easier to introduce in a network. In fact wherever you manage to establish a normal TCP or UDP connection, like from a browser to a server, you can use OpenVPN. There is no need for NAT traversal or the like. We strongly encourage you to use OpenVPN instead of IPSec if you can choose. The only argument which comes to our mind for using IPSec is interoperability to other vendors.
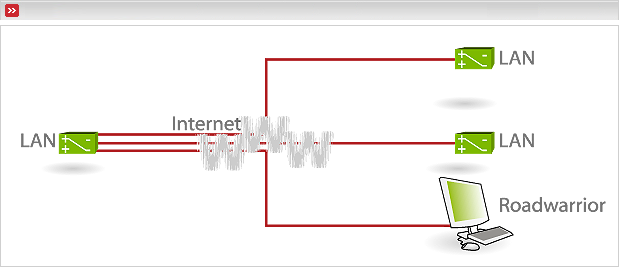
Figure 8.4. Figure of a VPN using OpenVPN as mixed VPN combining a Host-to-Net VPN (the Roadwarrior) and Net-to-Net VPNs in a hub-and-spoke topology
Endian Firewall implements both OpenVPN server and client. The administration interface is divided in two main parts Openvpn Server and Openvpn Net2Net client. Basically the OpenVPN server opens a virtual interface (the interface name begins with tap) whose function is to send bits to the OpenVPN server instead to the wire. The tap interface is joined with the GREEN bridge, so each connected client is - from the sight of the other machines behind GREEN - also directly part of the GREEN network. For the OpenVPN server it makes no difference at all if the client connects a whole net (Net-to-Net) or just a roadwarrior (Net-to-Host) and it makes no difference if there are connected one, two or many clients.
Another advantage compared to IPSec is the fact that the OpenVPN server acts like a switch (hub-and-spoke). Communication between the VPN endpoints is possible and communication between the connected OpenVPN clients is kept within the tunnel and goes always through the server process. It must not leave the tap interface on the server side and therefore must not be decrypted and then re-encrypted on the server.
As mentioned before, the OpenVPN web interface is split into two parts. The Openvpn Server and the Openvpn Net2Net client menu, which you can select on top of the page as a submenu of Virtual Private Networking. If you like to create a simple tunnel from one EFW to another, simlpy choose one side as server and configure it through the OpenVPN server page. The other side acts as a client and is configured on the client page. On the client's side there is certainly no need to start the server. If you have one side with dynamic IP's, use that one as client, since the client establishes the connection and may reconnect if the IP address changes. If you have NAT between the endpoints on the clients side, there is no problem at all. If you have NAT on the server side, simply forward the UDP port 1194 to the EFW.
The following describes the OpenVPN Server admin interface which you can find by clicking on the OpenVPN Server tab on top of the page.
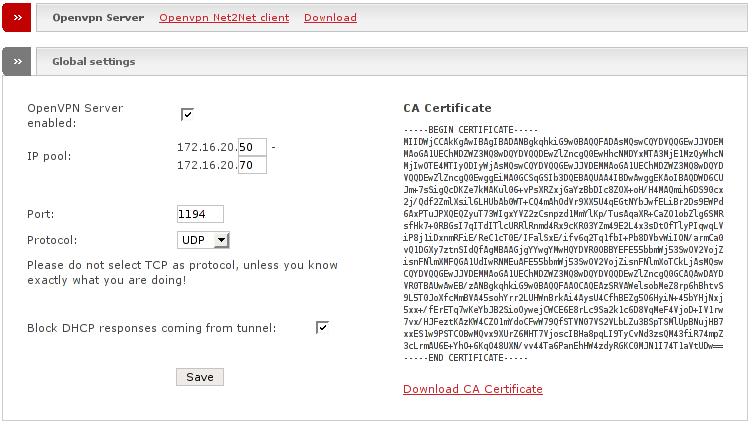
This box contains common configuration for the OpenVPN server.
- OpenVPN Server enabled
Tick this on if you like to enable the OpenVPN server on this machine.
- IP Pool
Fill in the start and end ip address of an ip range from GREEN network which you like to assign to the OpenVPN clients connecting to this server. Note that with Net-to-Net topology, only the remote EFW will get an IP from this range and not the workstations behind.
- Port
This is the port on which the OpenVPN Server will listen for incoming requests.
- Protocol
This option allows you to change your protocol from UDP to TCP.
Warning
Do not select TCP as protocol, unless you know exactly what you are doing!
- Block DHCP responses coming from tunnel
Since the virtual tap device of the OpenVPN server is joined with the GREEN bridge, broadcast packets of your GREEN zone will pass the tunnel. This includes DHCP requests from your workstations. If the client on the other side is in bridged mode, DHCP responses will return from it if the remote side has a DHCP server running. This may cause problems - if you do not want the remote DHCP server to assign IP addresses to your local workstations within GREEN tick this option to block the responses.
Note
Pay attention, this will not block the DHCP responses which come from your local DHCP and go to the remote network! You need to block them on the remote side.
- CA Certificate
This is the text representation of your Certification Authority Certificate. This is needed on every OpenVPN client that wants to connect to your OpenVPN server.
- Download CA Certificate
By clicking this link you can download the CA Certificate which is needed by each OpenVPN client in order to be able to connect to your OpenVPN server.
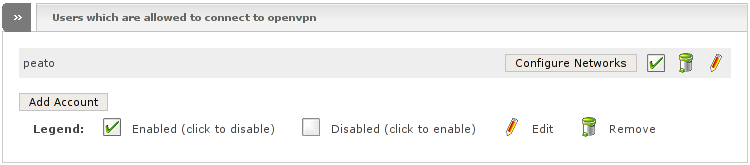
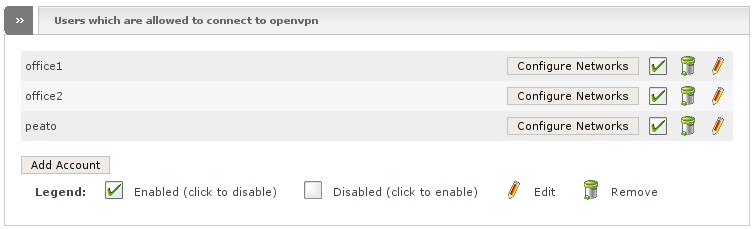
Below the global settings box, you will find the possibility to manage accounts which can connect to the OpenVPN server.
All known users will be listed within a table. Each line has the following action icons which will apply for the respective user:
- Configure Networks
When clicking this button you will be redirected to a new window where you can administer this user's network settings.
- Enabled icon
If this appears as a ticked on checkbox, the user is enabled and can connect. Click on it to disable or enable the user. Note that disabling an already connected user does not kick it, it just refuses reconnecting.
- Trash can icon
Click on it to remove the account.
- Pencil icon
Click on it to edit the respective account. This will open a new page which will be described later in Add Account.
Below, you will find a single button, Add Account, which allows you to add a new account. This button will open a new page which will be described later in the Add Account section.
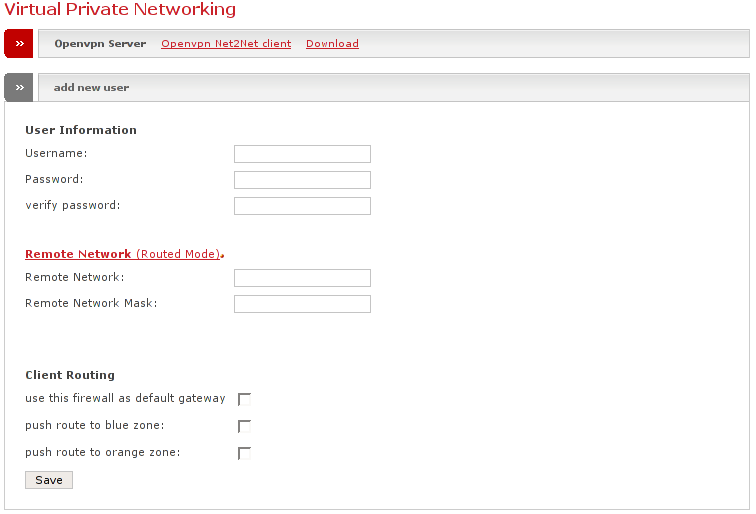
If you create a new account, you find the following configuration fields:
- Username
Fill in the username to be created
- Password
Choose a password for the new account.
- Verify Password
Fill in the same password as above. This is only for verification purposes in order to ensure that you typed the password correctly.
- Remote network
This is not needed if the remote client which uses to connect with this new account, is in bridge mode. Otherwise you need to specify the network address of the remote GREEN network in order to let the Endian Firewall create correct routing entries on both sides.
- Remote Network Mask
Fill in the netmask of the remote client if it is configured to be in routing mode.
- use this firewall as default gateway
Tick this on of you'd like to have the remote client to create routing entries in order to redirect all the traffic of the remote side through the VPN tunnel to your EFW, where it then can leave the RED interface. You normally want this on roadwarriors in order to enforce security policies, otherwise the remote side certainly has its own internet connection and a possible intruder may come in through the VPN and compromise the local GREEN network. Basically this option does the following on the remote side:
Creates a host route which sends all traffic with our RED IP address as destination to the IP address which is used as default gateway.
Removes the default route entry.
Creates a new default route entry with our GREEN IP address as gateway.
- push route to blue zone
This option will grant the new user access to your BLUE zone.
Note
This option is only available if you have configured your BLUE zone.
- push route to orange zone
This option will grant the new user access to your ORANGE zone.
Note
This option is only available if you have configured your ORANGE zone.
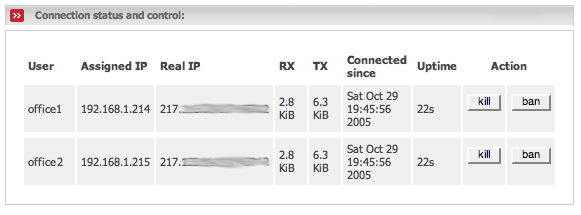
The following is below the box Users which are allowed to connect to openvpn and shows you all currently connected users.
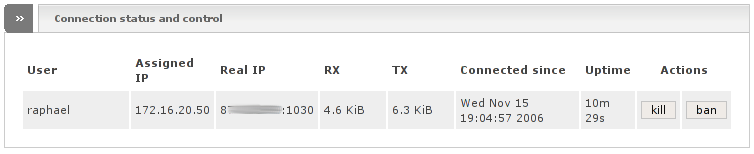
The table shows you the following information:
- User
The name of the user that is connected to the server.
- Assigned IP
The IP address which has been assigned to the client by the server. This IP address belongs to the GREEN IP range configured above.
- Real IP
The real public IP address of the connected client.
- RX
The data volume that has been received through this tunnel.
- TX
The data volume that has been transmitted through this tunnel.
- Connected since
The timestamp when the client has connected.
- Uptime
The amount of time the respective client is already connected.
The following actions can be performed on each connected user:
- Kill
Kills the connection immediately. The user can reconnect and this will happen since the openvpn client on the remote side will automatically reconnect as soon as it recognizes the disconnect, which will take up to a couple of minutes.
- Ban
Bans the user. In fact this deactivates and then kicks the user in a row. The user cannot reconnect.
This section describes the configuration of the OpenVPN client shipped with Endian Firewall. With this client, you can have the Endian Firewall connect to a remote OpenVPN server. Normally you will use this if you would like to create a Net-to-Net connection to another EFW. A client configuration needs the following information to be able to successfully connect to a remote OpenVPN server:
Username
Password
CA Certificate of the remote server.
You will get the CA certificate from the server if you push the Download CA Certificate link on Openvpn Server configuration page - on the remote Endian Firewall of course. This is needed to add an additional random information which one must have. In this manner it is not possible for attackers to connect to the VPN by only gathering the username and the password. They also need the certificate in order to be able to connect.
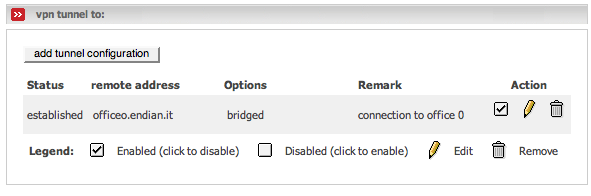
This page lists status-reports for the configured tunnels. You will notice that this page reloads every five seconds in order to update the status display if the status of some clients changes.

The following describes the displayed configuration items of each client and your action possibilites:
- Status
Displays the connection status of the respective tunnel. The following values do exist:
- closed
The tunnel is closed. There is no connection to the remote host.
- established
The tunnel to the remote host is established and working.
- connecting...
The client is actually trying to connect to the remote host.
- resolve error
The client could not resolve the remote's hostname. Probably the hostname does not exist or you have a problem with your DNS resolver.
- invalid ca cert
The CA certificate is invalid. Maybe you supplied the wrong certificate. Another possibility could be that the date on your host is wrong, so that the certificate is not yet valid.
- authentication failed
The client could not authenticate to the remote host. You may have supplied the wrong username or password.
- Remote Address
The remote host to which the client should connect.
- Options
Displays configuration options if they are set. Possibly values are:
- bridged
The client is in bridged mode.
- drop DHCP
The client blocks DHCP responses coming from the tunnel.
- Remark
Optional connection description.
- Action
To edit an existing tunnel, click on its pencil icon. The VPN tunnel values will be displayed in the add vpn tunnel settings section of the page.
To remove an existing tunnel, click on its trash can icon. You will be asked if you really want to remove the tunnel, and if you choose Yes, the tunnel configuration will be removed.
To enable or disable a rule - click on the Enabled icon (the checkbox in the Action column) for the particular entry you want to enable or disable. The icon changes to an empty box when a tunnel is disabled. Click on the checkbox to enable it again
Below you find a single button Add tunnel configuration, which allows you to create a new client configuration in order to connect to a remote Endian firewall or another sort of OpenVPN server.
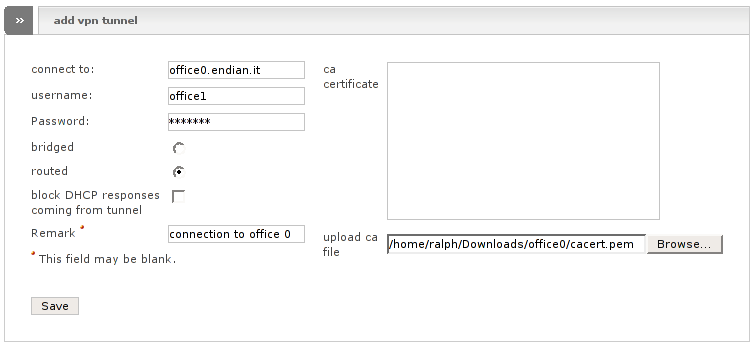
If you push the button Add tunnel configuration you will reach this page.

In order to create a new tunnel configuration you need to provide the following information:
- Connect to
IP address or public host name (FQDN) of the remote Endian Firewall (or other OpenVPN server).
- Username and Password
Username and password of the OpenVPN account created on the remote host.
- Bridged/routed
The OpenVPN client can run in either routed or bridged mode. The difference is in which OSI layer the client will act. If you specify bridged mode, the clients virtual tap device will be joined to the bridge of the GREEN zone (br0). As a member of the bridge, all traffic created within the GREEN network will also be passed through the tunnel to the remote side. This includes ARP traffic and other protocols which are below TCP. In this manner, the tunnel acts like a switchport. You can use this for example if you need to be able to browse the remote's Microsoft Windows servers. In order to access hosts on the remote side you certainly must use the same GREEN network address on both sides, since in fact those two GREEN networks will really be part of the same physical network.
Note
But pay attention, this option does not scale well and sends much unneeded traffic through the tunnel! Use it only if you really need it.
With routed mode the clients tap device will remain alone and will not be joined to the GREEN bridge. The device will obtain an IP address assigned by the remote OpenVPN server which selects it from the IP its configured pool. The two GREEN zones are splitted and the two networks will be routed. This all happens within a higher OSI layer. In order to make this work, you need to have different GREEN network addresses, since the two networks in this mode are not the same and need to be distinctable. You also need to specify your local GREEN network and network mask on the remote OpenVPN server in order to let the client set the needed routes.
- block DHCP responses coming from the tunnel
If you selected routed mode, this does not interest you at all. Otherwise, if you have selected bridged mode, the virtual tap device of the OpenVPN client is joined to the GREEN bridge. Therefore broadcast packets of your GREEN zone will pass through the tunnel. This includes DHCP requests from your workstations. Since the server on the other side is also part of this GREEN bridge, DHCP responses will return from it if the remote runs a DHCP server. This may cause problems - if you do not want the remote DHCP server to assign IP addresses to your local workstations in the GREEN zone. Tick this on if you would like to block these responses.
Note
Pay attention, this will not block the DHCP responses which come from your local DHCP and go to the remote network! You need to block them on the remote side.
- Remark
An optional connection description.
- CA certificate
Endian Firewall OpenVPN server CA certificate. You get this certificate by pressing the Download CA Certificate link on the remote OpenVPN server configuration page.
- CA certificate
you can paste your CA certifcate content (text) in this box or...
- upload CA file
...you can upload the CA certificate file.
- Save
Click "save" to add your configuration.
Situation: you have three branch offices with three Endian Firewall and you need to connect the offices in a unique network as star topology (hub-and-spoke) with encrypted tunnels.
Note
The clocks on either end of the EFW VPN tunnel should be up to date before configuring a VPN, otherwise the connection may not be established if the CA certificate is not yet valid because of a wrong clock.
Configure Endian Firewall OpenVPN server
One of the three Endian firewall must act as OpenVPN server (the hub):
Go to the OpenVPN server section ()
Set an IP address range which will be used to assign an internal (GREEN) IP address to the other two Endian Firewalls.
Tick on the Enabled box.
Now add 2 users, office1 and office2 (one for each Endian Firewall that will be connected to our Endian Firewall OpenVPN server) pressing on Add Account button in the Users which are allowed to connect to openvpn section.
Fill in the information in the add new user form items. In this case we assume that it is enough to use routed mode. You need to specify the GREEN network address and network mask of the respective branch office. (office1 and office2). If you want the new user to be able to connect to your BLUE or ORANGE zone you have to tick the respective push route to blue/orange zone checkbox.
Repeat step 4 and 5 for the second user.
Ok. The Endian Firewall in office0 is ready to receive VPN connections from the other offices.
Download the CA certificate file by clicking the link Download CA Certificate. You will need this file on both other Firewalls.
Warning
Pay attention to keep this file private.
Configure the Endian Firewall OpenVPN Net2Net client
Now we have to configure the Endian Firewall of office1 and office2.
Go to the office1 Endian Firewall web interface, to the Openvpn Net2Net client section ().
Click the button add tunnel configuration.
Supply the following information:
: insert the office0 Endian Firewall RED interface IP address, or the fully qualified host name (Eg. office0.endian.it)
: the username created on office0 Endian Firewall (see "Configure Endian Firewall OpenVPN server" point 4 and 5) (in this case: office1)
: the password for the user
Routed: in this case it probably would be better to choose routed.
: insert a connection description (optional)
: click on the Browse button and choose the file which you saved before within step 8.
Click on Save button.
Repeat step 1 to 4 for the office2 Endian Firewall.
If all is ok, the page VPN > OpenVPN Server > Openvpn Net2Net client on your office1 and office2 firewall should show you this:
and the office0 Endian Firewall should show you the following on the VPN > OpenVPN Server page:
With this configuration your workstations in the office1 and office2 nets should be able to reach the GREEN network of your office0.
In order to connect to the Endian Firewall OpenVPN server you can choose from a list of free projects which implement an openvpn client with a graphical user interface. One you can find on Mathias Sundman's OpenVPN GUI site. You can also download openvpn from the OpenVPN Homepage, which does provide the sourcecode package or a packaged Microsoft Windows Installer. Each major Linux distribution should have an own package of it and it has also been ported to other unix derivates.
Tip
Endian Firewall Enterprise Edition has a Linux package as well as a Windows package of the OpenVPN client available for download in the VPN > OpenVPN > Download section.
Next you need a valid and most notably Endian Firewall compatible configuration file. The OpenVPN server on the Endian Firewall:
runs as server of course, so your openvpn installation must act as client (--client) in order to successfully establish a connection.
listens on the standard port 1194 (--port 1194).
uses the UDP protocol (--proto udp).
encapsulates ethernet 802.3, therefore uses tap devices (--dev tap).
uses static key mode (--auth-user-pass).
uses fast LZO compression (--comp-lzo).
Example 8.1. An example command line to start openvpn on your roadwarrior
openvpn --client --pull --comp-lzo --nobind --dev tap --ca /path/to-the-ca-certificate.pem --auth-user-pass --remote your.remote.efw
Example 8.2. An example configuration file for openvpn on your roadwarrior
client
dev tap
proto udp
remote your.remote.efw
resolv-retry infinite
nobind
persist-key
persist-tun
ca path-to-the-ca-certificate.pem
auth-user-pass
comp-lzo
Note
Download the CA certificate using the appropriate link on the OpenVPN server configuration page and copy the certificate file to the location to which you point with the --ca parameter.