
In this page you find:
This section describes the Endian Switchboard and the functionalities it provides, including management options for the devices, the users, and their rights.
Changed in version 3.0-2014MMDD: New layout of the module.
New in version 3.0-2014MMDD: Configuration of Endpoints.
The Endian Switchboard Architecture.
The Endian Switchboard is a VPN-based solution that allows a seamless connection of diverse remote devices, called endpoints to a centralised server through gateways. Users who have access to the server can easily reach the gateways and the endpoints, provided they have the necessary access rights.
The diagram below presents a possible setup of the various components of the infrastructure, showing how they are interconnected:
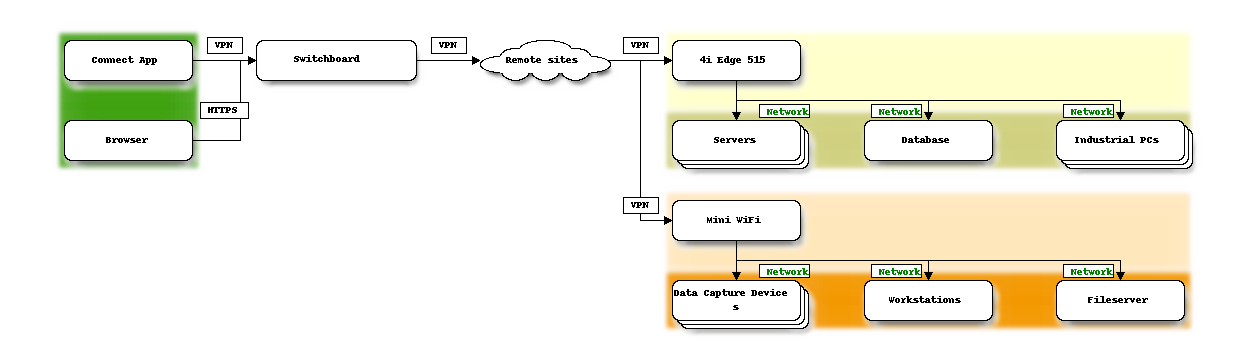
In a nutshell, there are two remote sites connected to the Switchboard by means of two gateways, which it turn control three endpoints each. The gateways are in “normal” modality (see below for more), so they have separate zones for the endpoints (GREEN) and for their uplink (RED).
The Switchboard and the client securely communicate over a protected channel using the SSL-encrypted OpenVPN protocol, which features data compression, automatic pushing of network routes, tunnelling, and an overall simplicity of configuration.
Finally, the Endian Connect App is a desktop application employed as a means to connect via VPN to the Switchboard, presenting the same GUI, plus the ability to directly connect to the endpoints.
More in detail, here follows the description of the various actors involved in the architecture.
Besides all the equipment, the Switchboard infrastructure encompasses also user management and applications that allow the set up of suitable access policies to the endpoints. Access policies determine on one side which user can access which endpoint and on the other side what all the applications that can be done on an endpoint.
Additional access policies
The Endian Switchboard implements an additional policy to restrict the access to remote gateways or endpoints: Exclusive access at either gateway or endpoint level, which allows a gateway or an endpoint to be accessed by only one user at a time, preventing other users to connect. This policy ensures that when a user operates on a critical endpoint or on a gateway controlling several sensible endpoints, her work is not interfered by someone else.
This policy is set globally: There cannot be some gateways (resp. endpoints) with exclusive access and some without. Moreover, if the policy is set at gateway level, it is propagated to all the endpoints controlled by that gateway, i.e., only who access the gateway can connect to the endpoints.
Finally, note that this policy can be disabled, granting concurrent access to all the infrastructure to everyone.
Switchboard Organizations
A recently added feature of the Switchboard are Switchboard Organizations that have been introduced to add support for multiple entities for a more granular division of complex enterprises into smaller, self-contained units (i.e., organizations), which can be arranged into hierarchies.
A Switchboard organization consists of one or more users and of one or more devices, be it gateways or endpoints. Users and devices within one organization can not see, access, or manage users and devices in other organizations. A user, a user group, or a device can belong to exactly one organization.
Within an organization, the default policy is that users can see all other users and all the devices in sub-organizations that are lower in the hierarchy.
The hierarchy within an organization consists of an unordered tree with a root node and at least one children or descendant, each node being one (sub-)organisation within the organization.
From a technical viewpoint, the sub-organisations are a bit different from the root node: Indeed the latter has some properties that the children inherit and cannot modify, because they are inherent to the whole organisation or to the Switchboard installation. These root node characteristics are:
This page contains a table showing all devices configured on the Switchboard, along with the following information for each of them:

 - connect or disconnect the device.
 - view logs of the device.
 - close and reopen the connection to the device.
Above the table, on the right-hand side appears a filter, useful to search among all devices that have been defined in the Switchboard. Simply write one or more characters and the matching devices will appear, concealing those that do not correspond. The search takes place within all the fields in the table, making the filtering more effective.
This page is composed of two tabs, namely Users and Groups. In the former, user management can be carried out, while in the latter, users can be arranged into groups.
In this page, all the users having the rights to connect to the Switchboard are listed in a table that shows the following data:

 - enable or disable the user.
 - modify the user.
 - remove the user. - see user’s activity log.
New users can be added by clicking on the Add User link at the top of the page. In the page that will open, the configuration options are grouped into these tabs: User, Permissions, Groups, Additional user information, and Provisioning.
This tab gives access to some basic information about the user.
Tick the checkbox to rely on a remote server for authentication. If selected, the two next options disappear.
Note
The remote server must be configured under
This field shows a string that can be used as token for the 2-factor authentication by the users of the switchboard. There are two buttons underneath:
In this tab it is possible to manage all the devices accessible by the user, its privileges on those devices, and the certificate associated with him/her.
The user can be granted several permissions:
Any combination of these values can be associated to the user.
In this tab there is a Multiselect box that allows to choose the groups that the user is member of.
More detailed information about the user can be supplied in this tab, including the certificate to be used for the authentication.
The drop-down menu allows to configure the user’s certificate. The available options are:
- Don’t change. Leave the current certificate. If the user has yet no certificate, one must be created.
- Generate a new certificate. Create a certificate.
- Upload a certificate . Upload a user certificate.
- Upload a certificate request. Upload a user certificate request.
Additional options appear when selecting the certificate, except for the Don’t change choice, which correspond to those found under section
By choosing Generate a new certificate, these new options are:
When selecting Upload a certificate, these options show up:
Finally, the following two options appear with the choice of Upload a certificate request.
In this tab appear two options for the management of the Endian Network credentials for the user.
A user group is a set of users that have access to one or more gateways or gateway groups with specific roles and permissions.
The page initially shows only the Add new User Group link and an empty table carrying the list of all the groups and some information about them:
- Modify the user group. - Remove the user group. - View the log files for the user groupWhen clicking on the Add Group link, the Editor opens right above the table. In the three tabs that compose the editor, new user groups can be defined, by supplying the following data:
This is the tab in which to define a new user group.
In this tab it is possible to add users to group, using a Multiselect box.
User roles in this user group
Select which users belong to the group and their role: From the multiselect box Add as choose the role, which is either member of or administrator of the group, then the user(s), by clicking on the + next to each user.
This tab contains a multiselect box for the management of devices accessible by this user group.
This page contains two tabs, Devices, in which to manage all devices reachable from the switchboard, and Groups, in which to configure groups of devices.
On the page a table containing the list of all the gateways that have already been configured is shown. It contains the following information:
- enable or disable the gateway. - modify the gateway. - remove the gateway. - see gateway’s activity log. - Download the configuration of the gateway.
Above the table two links are shown. When clicking the Download CA certificate link the Switchboard‘s CA certificate will be downloaded. This certificate must be used when configuring the VPN connection on the device itself.
When clicking the Add Gateway link, the gateway editor will open right above the table and a new device can be created. The editor consists of several tabbed pages, in which to configure all the different options of the gateway.
This tab contains the basic setup options for the gateway.
This tab contains information about all the endpoints that can be reached from the gateway and can be used to manage them.
The first information to be supplied is an approximate estimate of the endpoint that will be governed by the gateway.
Note
This information is particularly relevant, as it is used to create a virtual network in which to accommodate all the IPs assigned to each endpoint. In case of doubt, choose a size larger than the actual number of endpoints, or the network will not suffice to accommodate additional endpoints.
The virtual IP address to be assigned to the endpoint.
Note
When the option Enable automated virtual subnet assignment in the switchboard settings section is enabled, this option does not appear. Indeed, an IP address for each endpoint is automatically assigned by means of the above mentioned option.
A table showing all the endpoints controlled by the gateway, along with those information:
Each field in each table’s row can be edited by double-clicking on it: Depending on the type of information it carries, each field can show a drop-down menu (i.e., a “yes-no” choice for the Enabled column, or the available profiles for the Application Profile) or a text field (all the other).
The management of the endpoints can be done using the buttons at the bottom of the table:
By clicking on this button, the highlighted endpoint is eliminated from the gateway. This button is active only when one row is selected.
Warning
The deletion of a row is immediate and can not be reversed.
The users that shall have access to this gateway can be added from the multiselect box in this tab. Each user can assume the role of either regular user or manager of the gateway.
In this section it is possible to define the configuration for a remote gateway. The available configurations options are:
It is possible to assign a custom IP address of hostname to the OpenVPN server.
Changed in version 3.0-YYYYMM: The possibility to supply a FQDN.
A custom IP address of hostname of a fallabck OpenVPN server.
New in version 3.0-YYYYMM.
The options in this tab can be used to define on the gateway suitable port-forwarding rules that allow to redirect traffic coming from an endpoint to a given host.
The table contains the following information for each endpoint.
Each field in each table’s row can be edited by double-clicking on it: Depending on the type of information it carries, each field can show a drop-down menu (i.e., the list of the endpoint for the Endpoint column, or the available protocols for the Protocol columns), or a text field (all the other).
The management of the rules associated with the endpoints can be done using the buttons at the bottom of the table:
By clicking on this button, the highlighted rule is deleted from the set. This button is deactivated if no row is selected.
Warning
The deletion of a row is immediate and can not be reversed.
The page contains only the Add group link above a table (initially empty) carrying the list of all the existent groups and some information about them:
- modify the gateway group. - remove the gateway group. - see gateway group’s activity log.When clicking on the Add group link, the editor opens right above the table. The setup options are grouped in three tabs: Group, Members, and Permissions.
This tab contains basic information about the group.
The devices composing the group.
There are two tabs in this page: Applications, in which to define all possible means to connect to an endpoint, and Profiles, in which to group together several applications.
An application can be seen as a means to access from the Endian S.r.l., Italy Connect Client to an endpoint or a service running on an endpoint, possibly using a third-party application installed on the client side.
The page initially shows only the Add application link and an empty table that will carry the list of all the available applications and some information about each application:
- Enable or disable the application. - Modify the application. - Remove the application.When clicking on the Add application link, the applications editor opens right above the table. Here, additional applications can be defined.
Examples of applications
When choosing an external program for an application, several placeholders can be used. In the Action URL and Command path, there are:
New in version 3.0-2014-June: %PHYSICAL_IP% placeholder, that can be required by some application, instead of %DEVICE_IP% to correctly operate on the device.
In the Command args, the available placeholders are:
Application for accessing an endpoint via VNC using TightVNC, an open source application to connect to the desktop of a remote computer. The following is the configuration needed:
These standard assumptions apply: TightVNC is installed in the standard location and the VNC server runs on the endpoint on the port 5900.
Application for accessing an endpoint via SSH using PuTTy, an open source SSH client that consists of only a .exe file and installed in user’s home directory.
Note that username must be a valid user account on the endpoint.
Application for accessing an endpoint via HTTPS. The default browser of the workstation will be used.
Applications can be grouped together into Profiles and attached to single endpoints, tailoring the possibility of access to them. In other words, it is possible to configure applications on a given endpoint so that it can be reached only via some given protocol (e.g., RDP, SSH or HTTP) or service (VNC). The choice of the applications can be influenced also by the endpoint’s running operating system and services.
The page, which is initially empty, shows only the Add profile link, contains a table carrying the list of all the available profiles and some information about each profile:
 - Modify the application profile. - Remove the application profile.
Note
In case one or more profiles are deleted, though, the single applications will not be deleted: To remove an existing application, go to Applications.
When clicking on the Add profile link, the editor opens right above the table. Here, additional profiles can be created, by supplying the following data:
This page allows to set up all the global configuration options of the Switchboard. Before actually configuring the Switchboard, it is mandatory to accomplish two tasks in two other modules: Firewall and VPN.
The first task consists in the activation of the VPN Firewall, as this
is required by one option in the OpenVPN server. To complete the task,
go to
(VPN traffic) and, if not yet active, click on the grey switch
 .
.
Once that the VPN firewall has been enabled, the second task requires to set up a couple of options in the VPN module.
Indeed, the Switchboard relies on an OpenVPN instance running on the Endian UTM Appliance to provide secure connections between the clients and the devices. While most of the OpenVPN instance’s parameters can be freely chosen, two of them must be configured as follows:
The configuration options interested are:
In the Network options, the Bridged checkbox must not be ticked. Hence, if TAP is selected, do not tick the checkbox.
Note
When the TUN device is chosen, the traffic can only be routed and the checkbox is not accessible.
Under Advanced Options, the option Client to client connection should be set to Filter connection in the VPN firewall.
More information about the aformentioned options can be found under (see section OpenVPN server).
The public IP address or FQDN to be assigned to the Switchboard.
New in version 3.0-2014-July: The possibility to supply a FQDN.
The public IP address or FQDN to be assigned to the fallback server of the Switchboard.
New in version 3.0-2014-July..
This table contains all the available models that are to be used as gateways. Each model is accompanied with several information:
It is possible to add new gateway models by clicking on the Add row button, then editing the fields by clicking on each of them. Finally, by selecting a row, this can be either deleted or validated, using the Delete row and Validate, respectively.
Note
The importance of the model having installed a version of OpenVPN equal or bigger than 2.3 is that the newer version allows those endpoints to be natted. It also allows to assign them a virtual IP address at gateway level, simplifying networking and communication between the endpoint, the gateways, and the connected users.
Gateway provisioning and creation of certificates.
Gateway provisioning is a simple and effective means to create the configuration for a number of remote gateways in one place (the Switchboard or the Connect App) and then use the configuration during the gateway’s or endpoint’s first boot for them to immediately start working.
In order to generate the certificate used for the encryption and decryption of the provisioning file, on the Switchboard there is a simple shell script, to be used from the CLI: generate-provisioning-certificate, that will generate both the private key and the public key using OpenSSL and place them in the correct location on the filesystem.
Installation of remote gateways
More in details, a gateway can be configured directly from the Switchboard (resp. from the Connect App) before the gateway is shipped and installed in its expected location. After the configuration has been created for a gateway, it can be exported and encrypted on an USB key.
Hint
The provisioning’s options are described in this section.
The provisioning file, i.e., the file containing the settings,
is encrypted before it is stored on the USB key, using an own
certificate, generated on the Switchboard. The file name shall be
config_XXXXXXX.txt, where XXXXXXX is an arbitrary
string.
The USB key, in turn, shall be plugged in to the gateway before the first boot.
Once the gateway is switched on for the first time, a trigger
launches the provisioning-install script using the
provisioning settings’ file that is stored on the USB key. If the
gateway has already been installed, the trigger is not kicked off,
preserving the existent configuration.
Hint
An existent configuration can be overwritten from a USB
key if the root directory of the USB stick contains a
file called force_provisioning, using e.g.,
Linux’s utility touch.
See also
On the help.endian.com wep page the following tutorials are available:
- Switchboard Installation Guide
- Set up of a VPN Server Instance
From here it is possible to download the 4i Connect Client, that can be used from any workstation to both manage the Switchboard and to launch a connection to the devices, provided that the necessary applications are installed.