
This sections presents the conventions used in the remainder of the manual, then provides introductory notions about the concept of zones, and finally describes the GUI of the Endian Hotspot products and the possible ways to access the Endian Hotspot Appliance.
This manual has been written for the 3.2 release and is intended for all appliance types of the Hotspot series. Since the functionalities and abilities may differ between the various Endian Hotspot Appliances, the description of some of the displayed data or configuration options may slightly vary for some appliance or not being present at all. This guide is intended both as an online, contextual help as well as an user manual, providing also quick introductory descriptions to some of the concepts that lay behind the various functionalities provided by the Endian Hotspot Appliance.
The remainder of this section contains some basic information about this guide and how to move your first steps within the Endian Hotspot Appliance, introducing some important concepts and describing the most significant parts of GUI.
To improve the readability and clarity of this document, several conventions are used:
A Tooltip is displayed for various terms when moving the mouse over them.
Besides for emphasis, italics is used to denote non-interactive objects or labels within the web GUI, while a dashed-underlined word(s) indicates objects that require user interaction, i.e., clicking on a button or to open a hyperlink.
Admonitions are employed to mark items, actions, or tasks that require special attention:
Warning
Changing this value will cause the service to restart!
Note
Remember that you can modify this later.
Hint
Tips about configuration of options
A relevant subject or an example
In boxes like this one (“topic”), you can find the explanation of some subject that requires a not-so-short explanation and is relevant to the topic of the section or to the configuration of some setting. Also, quick how-tos or examples may appear in it. At their bottom there might be present one or more hyperlinks to online resources.
A sequence like requires to click on each of the items, in the sequence shown, to reach a particular page or configuration item. This example shows how to reach the page that shows the configuration of the system rules for the firewall’s DNAT.
Alternatively, in a sequence like , the [...] means that there is a large number of objects (in this case there is a list of firewall’s rules) from which one should be chosen to carry out on it the action (Edit).
These sequences can be found within “see-also” boxes, underheath an hyperlink, like this one:
See also
In the box, the hyperlink gives direct access to the documentation, while the sequence underneath it shows how to reach from the home page, the page where to configure that functionality.
Often, a “see-also” box is used to provide links to resources like e.g., online how-tos or other parts of the documentation.
There are also some terms that have a special usage or meaning throughout this manual, and that can be found in the Glossary.
One of the most important concepts on which the Endian Hotspot Appliance is grounded, the Zone, finds its root in IPCOP’s idea to protect the networks it can reach by grouping them into different segments -the zone, indeed- and allowing the traffic to be exchanged only in certain directions among these segments. The four main zones are identified by a color and may group together a number of servers of workstation that have a same purpose.
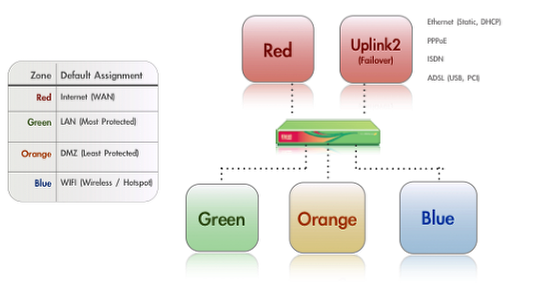
For the Endian Hotspot Appliance to correctly operate, it is not necessary to configure the ORANGE zone. Indeed, it suffices to define the GREEN and the BLUE zone, since also the RED zone can be in some cases left unconfigured.
The Endian Hotspot Appliance has pre-defined firewall rules that forbid the network
traffic to flow between some of the zones. Besides the four main
zones, two more zones are available, but are used only in advanced
setups: The OpenVPN clients zone (sometimes called PURPLE), and the
HA zone. These are two special zones that are used as networks for
the OpenVPN remote users that should connect to the Endian Hotspot Appliance and for
the HA service. By default, they use the 192.168.0.15/24 and
192.168.177.0/24 networks respctively, so those networks ranges
should not be used in the main zones, especially when planning to use
either of these services. Indeed, those networks would overlap,
possibly causing undesirable effects. The IP ranges of these two zones
can however be modified during the set up of the OpenVPN or HA
services.
To each zone corresponds an (network) interface and an IP
address. The interface is the (ethernet or wireless) port through
which the network traffic flows to the zone, so RED interface it the
port through which you can reach the RED zone and the Internet. The IP
address of the interface is the <Zone>IP. For example, the factory
setting for the GREEN zone is the 192.168.0.15/24 network, hence
the GREEN interface will have IP 192.168.0.15, which is referenced
to as the GREENIP.
See also
The GUI of the Endian Hotspot Appliance has been designed to be easy to use, and consists of five main parts: The header, the main menubar, the sub-menu, the main area, and the footer. A sample screenshot of the Service module can be seen below.
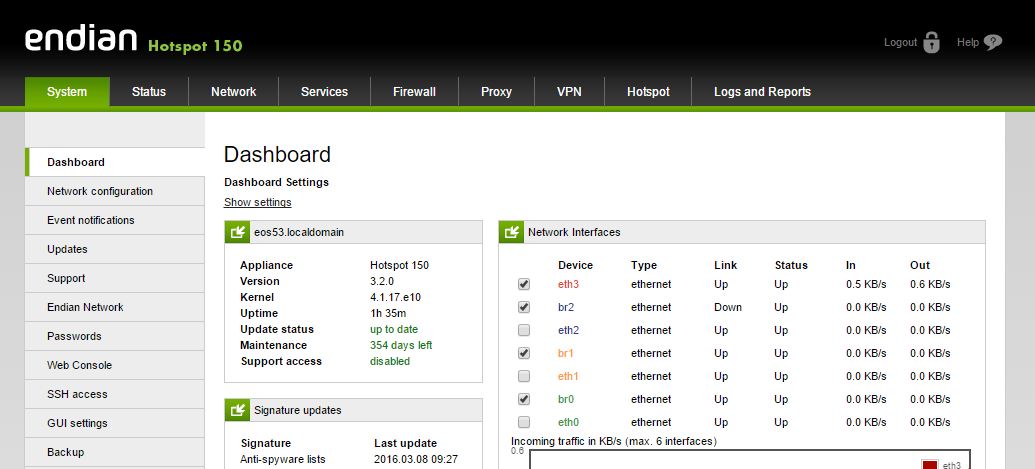
The header

The header of the page contains the Endian logo on the left, while on the right-hand side there is an image showing the type of Endian Hotspot Appliance, above which two links appear: one to the online documentation (help), which is context-dependent (i.e., from each page the correspondent help will be displayed) and one to logout from the GUI. This part is static and does not change.
The footer

The footer is placed at the very bottom of the page. It consists of two lines of text with a few infomation on the running Endian Hotspot Appliance. The top line shows (Status:) whether an uplink is connected of connecting and which one (if there are more than one uplinks defined) and the time elapsed (Uptime:) since the last time the connection was established and the uptime of the machine, which is reported as the output of the uptime command, i.e., the time since last boot, the number of users and the load average. When you change page, the information are updated. The bottom line shows the version of the appliance with the deployset, and the copyright, with a link to Endian web site.
The Main Navigation Bar

The main navigation bar, situated right below the header, is a menu bar with a black background and a green bottom line that displays all the available sections of the Endian Hotspot Appliance. When clicking on one of the modules (e.g., Services), its background becomes green, to emphasise the current open module. Upon clicking on a menu item, the sub-menu on the left of the page and the title at the top of the main area change, since they are context-dependant. By default, the GUI opens on the System menu.
The sub-menu
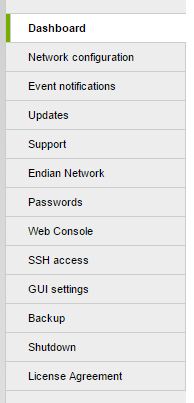
The sub-menu appears on the left-hand side of the GUI and changes depending on the module selected on the menubar. It appears as a vertical list of items that can be clicked to change the content of the main area and to access all the functionalities included in that Endian Hotspot Appliance‘s module.
The Main Area
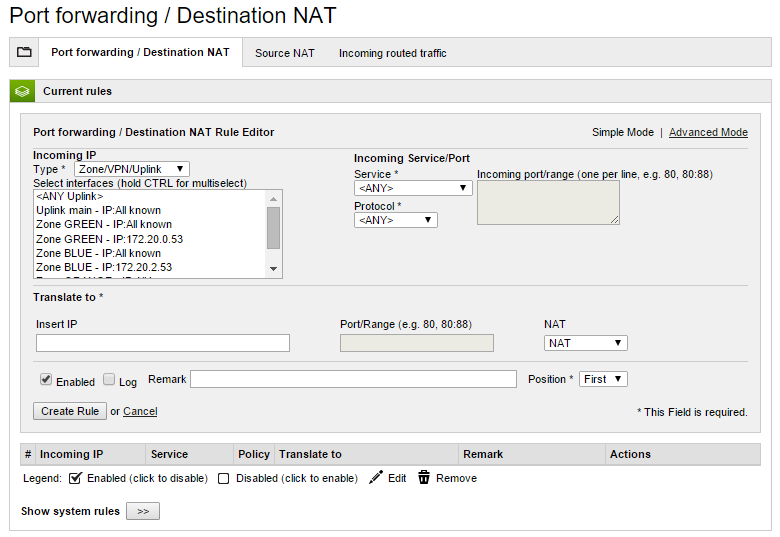
The main area contains all the information and settings encompassed by the current selection of the menu/sub-menu combination. Some of the pages (e.g., the Dashboard or parts of the Service and Logs modules) are simply informative, showing the current status of the Endian Hotspot Appliance either graphically or textually, in the latter case conveying the output of linux commands on the screen. The vast majority of the pages, however, shows a table containing various information about the current configured settings, allowing to modify or delete existing items and settings and to add new ones. Particularly elaborate services like e.g., the HTTP proxy or the firewall, contain so many configuration options that a single page does not suffice to present them all, so the available settings are grouped together and organised in tabs.

Within tabs, often the configuration options are packed in one or more boxes, that gather together settings that refer to a common part of the overall configuration.
The Hotspot Administration Interface
The only exception to the layout of the Endian Hotspot Appliance GUI is the Hotspot Administration Interface, pictured in the screenshot below, which has no footer, places the submenu under the main menubar, and presents on the far right of the menubar a Main menu link to go back to the main menu.
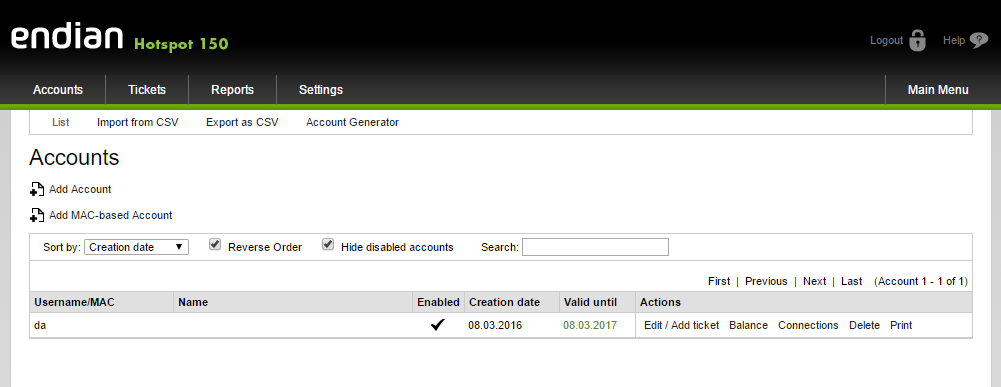
Note that when referring to items under the Hotspot Administration Interface, the initial Menubar is usually omitted.
The Icons
Many icons are used throughout the pages served by the Endian Hotspot Appliance to denote either an action that can be quickly carried out, or convey some meaning to the settings shown.
- Switches

- Switches are used to entirely enable or disable a service and are present on the top of the main area. The gray switch suggests that the service is disabled and inactive, with the main area showing no settings or configuration options. Upon clicking on it, the service and the daemons that are necessary for its proper functioning are started and initialised. After a few seconds, the switch’s color turns green and all the configuration options available will appear. To disable the service, click again on the switch: This causes all the daemons to be stopped, the switch to turn grey, and the settings to disappear.
- Policies
These icons are found in those services that require some form of access policies or traffic control, like, e.g., firewall rules or proxy specifications. Whenever a packet matches a rule, the policy specified for that rule is applied, determining if and how the packet can pass or not.
accept the access with no restriction.
blocks the packets and discards it.
blocks the packets, but a notification is sent to the source.
partial accept the rules. This is only found on the heading of a list of policies, to give at a glance the idea that some of the policies in the list are accepted and some are rejected, like e.g., in .
- Other icons
Additional icons that can be found on the Endian Hotspot Appliance.
expands a panel, revealing its content.
closes a panel, hiding its content.
- Navigation bar
- In most places where a long list of item appears, a navigation bar appears to ease the listing of the items, which is composed of several cells: First and Previous on the left, Next and Last on the right, which enclose a variable amount of cells containing the page numbers. Clicking on the various cells leads to either the page indicated by the number, to the first or last page, or to the previous and next page.
Common Actions and Tasks
There are two types of actions that can be performed within the GUI: Actions on a single item in a list of configuration settings (i.e., one firewall rule), and ‘global’ actions to save, store, and apply all the settings in a list, a box, or a page.
- Actions and icons
These icons are placed in the Actions column on the right of the various tables that appear on the pages and usually show a list of the items defined, like e.g., the firewall rules or the OpenVPN users. The actions’ icons allow to execute one task on the element of the list to which they correspond. Some action is only available on some type of lists:
and
indicate the status of an item, enabled and disabled respectively. You can change the status by clicking on the icon. After that, a callout may notify you to restart service, if this is needed, to let the daemons reload the configuration and activate the changes.
and
are available only in lists where the order is important, e.g., firewall rules, and allow to modify the order by moving up
allows to modify the current item. Clicking on this icon will open the appropriate editor for that item.
causes the selected item to be removed from the list and from the configuration. A message will appear, asking for confirmation before the item is definitely deleted.
allows to download the item (usually an archive).
- ‘Global’ Actions
At the bottom of every page that allows the customisation of one or more options, there is the option to Save and store the new configuration on disk or to cancel the customisation done so far. In the latter case, no further action is required, since the configuration did actually not change. In the former case, however, it proves necessary to restart the service just modified, and perhaps also a few other related or dependant services, for the new settings to be reloaded and used in the running configuration. For the sake of convenience, when this action is required, a callout is displayed after the settings have been saved, with an Apply button, to be clicked to restart the service.
Whenever a Multiselect box is used (e.g., in ), Add all and Remove all can be clicked as shortcut to add or remove all the available entries from the list of the available items or the selected and active items, respectively.
- Multiple entries in one configuration option
- In several places, several values can be entered for a single configuration item, for example the source or destination of a firewall rule. In those cases, either a textarea or a drop-down menu is shown. In the former case it is possible to enter one value per line, like e.g., it a MAC address, a network range (in CIDR notation), or an OpenVPN user. In the latter case, the choice is limited among a number of predefined values, that can be selected by holding the
Controlkey on the keyboard and clicking on the values to be selected.
IPv4 and CIDR notation.
An IPv4 address is a network address whose length is 32 bits, divided in four, 8-bits long octets. In decimal, each octet can assume any value between 0 and 255 (28= 256).
When specifying a network range, the IP address of the first host on the network along with the subnet mask, or netmask for short, is given, which defines the number of hosts available in that network. The subnet is defined as the length of the network prefix, i.e., that part of the address shared by all the hosts in a network.
There are two possibilities to denote the network/netmask pair:
explicitly, i.e., both are given in quad dotted notation. For example:
network 192.168.0.0
netmask 255.255.255.0
This is a network starting at the address 192.168.0.0 with 256 host available, i.e., the network range from 192.168.0.0 to 192.168.0.255. The first three octet in the netmask are 255, showing that there are no free host (or that this part of the address is the network prefix), while the fourth is 0, meaning that all hosts (256 - 0 = 0) are available.
in CIDR notation, a more compact way to show the network range, in which the free bits instead of the free hosts are given. The same network range as above is expressed as:
192.168.0.0/24
This notation shows the length in bits of the shared part of the IP address. 24 means that the first three octets (each consisting of 8 bits) are shared, while the fourth octet is free, giving a number of free hosts that is equivalent to 32 - 24 = 8 bits, i.e., 256 hosts.
The same line of reasoning can apply to an IPv6 address, with the only difference that IPv6 addresses are 128 bits long.
There are several ways to access the Endian Hotspot Appliance: The most intuitive and straightforward one is from the web-based GUI. There are also console-based access via SSH and serial console, although they are suggested to advanced users only.
Hint
The default IP address of the Endian Hotspot Appliance is 192.168.0.15.
The recommended access to the Endian Hotspot Appliance GUI is very simple: Start the browser and enter the GREENIP address, whether or not this is the first time the Endian Hotspot Appliance is used.
The browser will be redirected to a secure HTTPS connection on port 10443. Since Endian Hotspot Appliance uses a self-signed HTTPS certificate, the browser might ask to accept the certificate during the first connection. The system will then ask for username and password. Specify “admin” as the username and provide the password received from the reseller or, if the Endian Hotspot Appliance has already been customised, insert the password that provided during the installation.
After entering the password, the Dashboard of the Endian Hotspot Appliance GUI is displayed, and it is possible to immediately start exploring the information available on this interface or further browse and configure the appliance. The rest of this manual follows the layout of the main navigation bar: Each item in the main menu-bar represents a different section of the Endian Hotspot Appliance and is presented in a separate chapter, with sub-menu items and tabs having sub- and sub-sub-sections headings markup respectively.
Console-based access to the Endian Hotspot Appliance is suggested only to users that are acquainted with the Linux command line.
Two possibilities are available to reach the CLI: Using SSH access or via serial console. SSH access is by default disabled, but can be activated under , while Serial Console access is enabled by default on all appliances with the following parameters:
Hint
The baud rate is 38400 in older appliances that have not yet upgraded to the 3.0 release.
The connection using the serial console requires:
or
Note
In case the network is not configured properly, the serial console may represent the only way to access the Endian Hotspot Appliance.

