This subsection allows you to configure the Port Forwarding settings for Endian Firewall. This is 100% optional, so you may safely ignore this section if you do not wish to make use of this feature.
Firewalls prevent externally initiated requests from accessing the protected system. However, sometimes, this may be too strict. For example, if one is running a web server, then any requests to that web server by users outside of the protected network will be blocked by default. This means that only users on the same internal network can use this web server. Obviously this is not the normal situation for web servers. Most people want people from the outside to be able to access the server. This is where Port Forwarding comes in.
Port Forwarding is a service that allows limited access to the internal LANs from the outside. When you set up your server, you can choose the receiving or “listening” ports on the internal network machines. These ports differ for every kind of service that may be hosted. Please refer to the documentation that came with your servers to set up the ports on those servers.
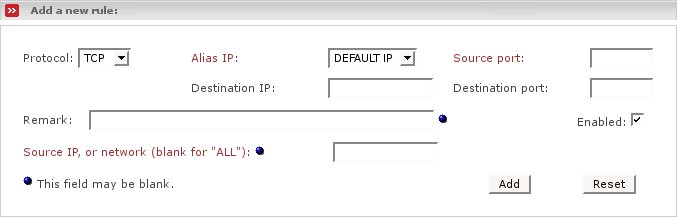
Once those receiving ports are ready, you can enter the information that is needed into the administration interface on Endian Firewall. The following describes each configuration fields:
- Protocol
This drop down list allows you to choose which protocol this rule will follow. Possible values are TCP, UDP and GRE. Most regular servers use TCP. Some game servers and chat servers use UDP. The GRE protocol is used for example in PPTP. If the protocol is not specified in the server documentation, then it usually is TCP.
- Source port
This is the port to which the outsiders will connect. In most cases, this will be the standard port for the service being offered (80 for web servers, 20 & 21 for FTP servers, 25 for mail servers, etc.) If you want to you may specify a range of ports to forward. To specify a range use the “:” character between two port numbers, lowest number first.
Note
Port ranges cannot overlap each other.
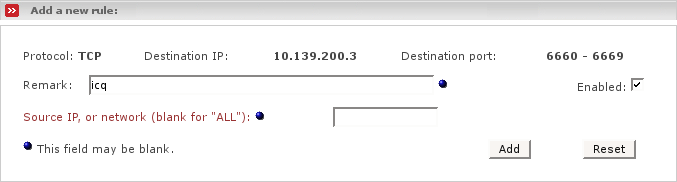
- Destination IP
is the internal IP address of the server (for example, you may have your web server running on 192.168.0.3).
- Destination Port
is the port that you have chosen when you set up your server in the first paragraph. You only need to enter the source port, the destination will be filled in for you if it does not differ.
- Alias IP
This dropdown menu allows you to choose which RED IP will be affected by this rule. Endian Firewall has the capability of handling more than one RED IP. With the Aliases submenu in the Network main menu you are able to configure them. If you only have one RED IP set up, then choose Default IP.
- Remark
This is optional. As the name says this field allows you to add some remark, in order to easier identify the rule in the current rules list.
- Enabled
Tick this box on to enable the current rule. You may temporarily disable a rule by ticking it off.
Endian Firewall automatically creates a NAT rule for each zone for each configured port forwarding rule in order to allow access to ORANGE not only from RED but also from each of the other zones.
Note
If you create a port forwarding rule from an alias IP, Endian Firewall automatically generates NAT rules for outgoing connections started by the machine to which the port has been forwarded. In order to change the source IP address to the respective alias IP. This NAT will occur only for destination ports equal to those forwarded. This is needed for example if you want to run a mail server within the DMZ and therefore forward port 25 to the machine in the ORANGE network. That machine certainly needs to send mails with the alias IP and not with the main RED IP address.
The External Access page has NO effect on the GREEN or ORANGE networks. It is here to allow you to open ports to the EFW box itself and not to the GREEN or ORANGE networks.
How do you allow external access then? It is combined with the Port Forwarding page - there is a field on the page labeled: 'Source IP, or network (blank for "ALL"):'
This is the field that controls external access - if you leave it BLANK, your port forwarding rule will be applied to ALL INTERNET ADDRESSES. Alternatively if you put an address or network in this field access will be restricted to that specified network or internet address.
You can have more than one external address - after you have created the port forwarding entry, it will appear in the table. If you wish to add another external address, click the Red Pencil with the Plus sign next to the entry - the entry screen at the top of the page will change (it will load the values from the port forwarding entry) and allow you to enter an external IP address or network. When added you will now notice that there is a new entry for this forwarded port in the table.
Note
You can have port ranges and wildcards. Valid wildcards are:
* which translates to 1-65535
85-* which translates into 85-65535
*-500 which translates into 1-500
Reserved ports - on the main Red Address (DEFAULT IP) some ports are reserved for EFW services, they are 67, 68 for doing DHCP on RED and 10443 for the web interface itself.

You already noticed the rules listing below in the Current rules box, since this is the place where you can find the red pencil icon. You can edit a record by clicking on the Yellow Pencil icon in the Action column and until you hit the update button nothing changes and nothing is lost. When you are editing a record you will see the record highlighted in yellow. When you edit a port forwarding rule, there will be an extra check box labeled Override external access to ALL. This is used as a quick and dirty way to open a port to ALL Internet addresses for testing or whatever your reasons may be.
To delete a record, click on the Trash Can icon on the right hand side of the Action column.
Note
If you have a forwarded port with multiple external access rules and delete all of the external access rules, the port becomes open to ALL addresses, be careful.
There is a Shortcut to enable or disable a port forward or external access - click on the “Enabled” icon (the checkbox in the Action column) for the particular entry you want to enable or disable. The icon changes to an empty box when a rule is disabled. Click on the checkbox to enable it again.
Note
When you disable the port forward, all associated external access rules are disabled, and when you enable the port forward, all associated external access rules are enabled.